Wednesday, 18 May 2011

How to dynamically clone Salesforce objects with all fields populated


UPDATE 25/04/2012: If cloning child objects using a custom button is of interest to you, check out my post regarding Clone Plus!!!  

There are several scenarios during development where it becomes necessary to create complete copies of instances of Salesforce objects. Salesforce already provides a generic "clone" method to copy objects by casting them first to a more primitive base sObject. The clone method for sObjects even has a parameter which re-creates all relationships opt_IsDeepClone. The documentation describes that turning this option to true will result in a full copy of the sObject being returned by the method.

However, a common problem developers have when using this method is that it does not automatically copy all of the objects field values from the database. Instead, the opt_IsDeepClone option only copies the field values currently held in memory that have been retrieved through use of a SOQL query or have been populated directly in the Apex code. 

It is well known that Salesforce does not provide a "SELECT * FROM" method, so creating a cloning method that is guaranteed to copy all fields, and maintaining that functionality if any modifications are later made to the object, is challenging.

The way to accomplish a complete clone including all field values is to make use of the schema object definitions, which are accessible through apex code. You can use these definitions to retrieve all the fields for a particular object. These field name strings can be concatenated into a SOQL query to ensure all values are retrieved. My example code can be seen below:

public class SObjectAllFieldCloner {

  // Clone a list of objects to a particular object type
  // Parameters 
  // - List<sObject> sObjects - the list of objects to be cloned 
  // - Schema.SobjectType objectType - the type of object to be cloned.
  // The sObjects you pass in must include the ID field, 
  // and the object must exist already in the database, 
  // otherwise the method will not work.
  public static List<sObject> cloneObjects(List<sObject> sObjects,
                                        Schema.SObjectType objectType){
    
    // A list of IDs representing the objects to clone
    List<Id> sObjectIds = new List<Id>{};
    // A list of fields for the sObject being cloned
    List<String> sObjectFields = new List<String>{};
    // A list of new cloned sObjects
    List<sObject> clonedSObjects = new List<sObject>{};
    
    // Get all the fields from the selected object type using 
    // the get describe method on the object type.
    if(objectType != null){
      sObjectFields.addAll(
        objectType.getDescribe().fields.getMap().keySet());
    }
    
    // If there are no objects sent into the method, 
    // then return an empty list
    if (sObjects != null && 
        !sObjects.isEmpty() && 
        !sObjectFields.isEmpty()){
    
      // Strip down the objects to just a list of Ids.
      for (sObject objectInstance: sObjects){
        sObjectIds.add(objectInstance.Id);
      }

      /* Using the list of sObject IDs and the object type, 
         we can construct a string based SOQL query 
         to retrieve the field values of all the objects.*/
    
      String allSObjectFieldsQuery = 'SELECT ' + sObjectFields.get(0); 
    
      for (Integer i=1 ; i < sObjectFields.size() ; i++){
        allSObjectFieldsQuery += ', ' + sObjectFields.get(i);
      }
    
      allSObjectFieldsQuery += ' FROM ' + 
                               objectType.getDescribe().getName() + 
                               ' WHERE ID IN (\'' + sObjectIds.get(0) + 
                               '\'';

      for (Integer i=1 ; i < sObjectIds.size() ; i++){
        allSObjectFieldsQuery += ', \'' + sObjectIds.get(i) + '\'';
      }
    
      allSObjectFieldsQuery += ')';
    
      try{
      
        // Execute the query. For every result returned, 
        // use the clone method on the generic sObject 
        // and add to the collection of cloned objects
        for (SObject sObjectFromDatabase:
             Database.query(allSObjectFieldsQuery)){
          clonedSObjects.add(sObjectFromDatabase.clone(false,true));  
        }
    
      } catch (exception e){
        // Write exception capture method 
        // relevant to your organisation. 
        // Debug message, Apex page message or 
        // generated email are all recommended options.
      }
    }    
    
    // return the cloned sObject collection.
    return clonedSObjects;
  }
}

An example of how you would call this method  to clone an Account object from another Apex controller is:

Account originalAccount = [select Id from Account where 
                                name = 'My Favourite Account'];

sObject originalSObject = (sObject) originalAccount;

List<sObject> originalSObjects = new List<sObject>{originalSObject};
      
List<sObject> clonedSObjects = SObjectAllFieldCloner.cloneObjects(
                                      originalSobjects,
                                      originalSobject.getsObjectType());
                                     
Account clonedAccount = (Account)clonedSObjects.get(0);

Notes: This query only copies a single type of object at a time, related child objects are not cloned, however all lookup relationships/master record references are copied. Also in this example, I have shown how to create a virtual "SELECT * FROM" to make this resistant to change. This type of query should only be used when absolutely necessary, never out of developer laziness.

There are a lot of combined concepts in this example; mapping objects, using object definitions and generic sObject methods amongst other. If you require any further explanation to any of the elements of this solution, please list a question below.

Monday, 4 April 2011

Top 5 tips for passing the Salesforce.com certified Force.com developer (SP11) exam

I recently passed the Salesforce.com certified Force.com developer (SP11) exam (hence the shiny new icon on the right). The test covers a variety of material relating how to build applications using the platform. If you are preparing for the exam, here are my top 5 tips for successfully passing.
  1. This is not a coding exam

    The purpose of the developers exam is to measure how effectively you can describe how to use the various aspects of the platform to construct applications, not to prove how well you can code Visualforce pages or Apex classes. It is more important to be able to define when to use these tools, rather than how.

  2. Go back to basics

    If like me, you have been working primarily on providing specific customization to applications for a while, it is a good idea to re-reference all the components available on the Force.com platform. Part of my preparation for the exam included building the recruitment application as described in Force.com Fundamentals, which really helped to re-enforce how to use every aspect of the platform.  

  3. Learn to share

    A substantial proportion of the questions in the test are centered around how to enable and restrict access to objects and records. Learn the different methods of sharing and appreciate in what kind of scenarios these should be implemented. You should understand the whole range, from object level CRUD permissions using profiles to sharing records using public groups and manual rules. Also, in a similar vein, you should be aware of the relationship that page layouts have with record sharing.

  4. Know the optional extras

    Aside from the standard Force.com platform functionality, there are several additional features that can be included in an organization by contacting Salesforce. Examples of such features are encrypted fields to encrypt data shown to particular users and enabling the use of multiple currencies. Fortunately, all you need to know about these extras is included in the Study Guide.

  5. A report is more than just a table of data

    The reporting tool included on the force.com platform is highly customizable, and you will need to be aware of how you can adapt reports to a specific purpose. It is essential to learn the various report types, and given a situation which one you would use. The same is also true of dashboard components, understand what each is used for and recognize when it is appropriate to use them. When revising the use of reports, rather than just read, I think the best approach is to get hands on. If you have a developer force account, construct several reports and dashboards and really experiment with the various ways of presenting data to users. 

I wish you the best of luck!

Tuesday, 22 March 2011

Working with Apex data tables: Confirming choices

In my previous post, I used Apex page messages to provide direct feedback from an action to users. If the action you are about to perform is particularly critical or hard to reverse, you may want to add some kind of confirmation mechanism. Of course we could simply use a javascript function on the page to produce a simple confirm pop up, but it is usually preferable to provide something more comprehensive. An effective way to do this in Salesforce is to create a two page Visualforce menu consisting of an action page and a confirmation page, where we can make sure the user is aware of the action they are about to perform.

I have built an example of such a menu based on the page and controller from my previous post. When the user selects contact records and clicks on "process selected contacts", they are taken to a confirmation page that displays the contacts that they have selected, and asks them to confirm that these are the records they wish to process. This confirmation page shares the same controller as the main selection page. They can choose to cancel, which will return them to the previous selection menu taking no action, or click confirm to accept the selections and then be returned to the selection menu. Here is a screenshot of the confirmation screen:


In terms of altering the controller code, I added two new actions to confirm and cancel processing the contact records. Users can be directed to a particular page by returning a page reference (of the form "Page.*Visualforce page name*") in the action, or null to remain on the same page. If no records are selected on the first page, then instead of being directed to the confirmation page, the user will remain on the selection page, and an error message will be displayed.

In order for menus like this to work, the two pages must share the same controller type. Also, ensure that all page references used to change the page do not have the redirect attribute set to true, otherwise the users selections will be lost as the controller is reset.

Below is the Apex controller and Visualforce page code for the example.

Controller:
public class WorkingWithApexDataTablesController {

 public List<ContactWrapper> allContacts { get; set; }
 public Boolean allChecked { get; set; }
 
 public WorkingWithApexDataTablesController () {
  allContacts = new List<ContactWrapper>();
  allChecked = false;
  
  for(Contact contact: [select Name, Title, Department, Email                                   from Contact ]){ 
   allContacts.add(new ContactWrapper(contact));
  } 
 }
 
 public PageReference CheckAll(){
  
  for(ContactWrapper contact : allContacts){
   contact.selected = allChecked;
  }
  
  return null;
 }
 
 public PageReference ProcessSelectedContacts(){
  
  // If at least one contact has been selected,
  // forward to confrimation page
  for (ContactWrapper contactWrapper : allContacts ){
   if(contactWrapper.selected == true){
    return Page.WorkingWithApexDataTablesConfirmation;
   }
  }  
  
  // if no contacts have been selected, write an error message
  Apexpages.addMessage(new ApexPages.Message (ApexPages.Severity.ERROR,                                               'No contacts selected'));
  return null;
 }

 public PageReference confirmSelectedContacts(){
   
  List<String> selectedContacts = new List<String>{};   

  for (ContactWrapper contactWrapper : allContacts ){
   if(contactWrapper.selected == true){
    selectedContacts.add(contactWrapper.con.Name);
   }
  }
  
  // otherwise, write a confirmation message 
  Apexpages.addMessage(new ApexPages.Message (
     ApexPages.Severity.CONFIRM, selectedContacts.size() + 
     ' contacts selected ' + selectedContacts));
  
  // If all contacts have been selected, write a warning message
  if(selectedContacts.size() == allContacts.size()){
   Apexpages.addMessage(new ApexPages.Message (
     ApexPages.Severity.WARNING, 'All contacts selected'));
  }
   
  return Page.WorkingWithApexDataTables;
 }
 
 public PageReference cancelConfirmSelectedContacts(){
   
  // If the users cancels the action at the confirmation screen, 
  // return them to the main screen with a cancellation message
  Apexpages.addMessage(new ApexPages.Message (
    ApexPages.Severity.CONFIRM, 'Action Cancelled'));   
   
  return Page.WorkingWithApexDataTables;
 }
 
 public List<Contact> getSelectedContactObjects(){
  List<Contact> selectedContactObjects = new List<Contact>{};
  
  for (ContactWrapper contactWrapper : allContacts ){
   if(contactWrapper.selected == true){
    selectedContactObjects.add(contactWrapper.con);
   }
  }
  
  return selectedContactObjects;
 }

 public class ContactWrapper {
  
  public Contact con{get; set;}
  public Boolean selected {get; set;}
        
  public ContactWrapper(Contact c){
   con = c;
   selected = false;
  }
 }
}

WorkingWithApexDataTables Page:
<apex:page controller="WorkingWithApexDataTablesController">
  
  <apex:sectionHeader title="Working With Apex Data Tables"/>
  
  <apex:pageMessages />
  
  <apex:form >

    <apex:dataTable value="{!allContacts}" var="c" id="contactsTable">
      <apex:column >
        <apex:facet name="header">
          <apex:inputCheckbox value="{!allChecked}">
            <apex:actionSupport event="onclick" action="{!CheckAll}"
                                rerender="contactsTable"/>
          </apex:inputCheckbox>
        </apex:facet>
        <apex:inputCheckbox value="{!c.selected}"/>
      </apex:column>
      <apex:column value="{!c.con.Name}" headervalue="Full Name"/>
      <apex:column value="{!c.con.Title}" headervalue="Title"/>
      <apex:column value="{!c.con.Department}" 
                   headervalue="Department"/>
      <apex:column value="{!c.con.Email}" headervalue="Email"/>
    </apex:dataTable>

    <apex:commandButton action="{!ProcessSelectedContacts}" 
                        value="Process Selected Contacts"/>

  </apex:form>
</apex:page>

WorkingWithApexDataTablesConfirmation Page:
<apex:page controller="WorkingWithApexDataTablesController">
  
  <apex:sectionHeader                                                           title="Working With Apex Data Tables (Confirmation)"/>
  
  <apex:form >

    <apex:outputText value="You have selected the following contacts for                            processing, are you sure?"/>

    <apex:dataTable value="{!selectedContactObjects}" var="con"                             id="selectedContactsTable">
      <apex:column value="{!con.Name}" headervalue="Full Name"/>
      <apex:column value="{!con.Title}" headervalue="Title"/>
      <apex:column value="{!con.Department}" headervalue="Department"/>
      <apex:column value="{!con.Email}" headervalue="Email"/>
    </apex:dataTable>

    <apex:commandButton action="{!CancelConfirmSelectedContacts}" 
                        value="Cancel"/>

    <apex:commandButton action="{!ConfirmSelectedContacts}" 
                        value="Confirm"/>

  </apex:form>
</apex:page>

Thursday, 3 February 2011

Working with Apex data tables: Displaying selections and errors using page messages

In my opinion, Apex page messages is one of the most useful and straightforward Salesforce development features available. When developing custom functionality inside Visualforce pages, we can leverage page messages to give a user direct feedback. We could inform them for example that an action has been successful, or explain why an error has occurred.

The controller code to create a new page message and add it to the current page:
Apexpages.addMessage(new ApexPages.Message(ApexPages.severity,                                                  messageBody));
for example:

Apexpages.addMessage(new ApexPages.Message (ApexPages.Severity.ERROR,                                           'Hello World Error'));

To display the messages on the page is simply a case of using the apex:pageMessages tag, like so:
<apex:pageMessages/>

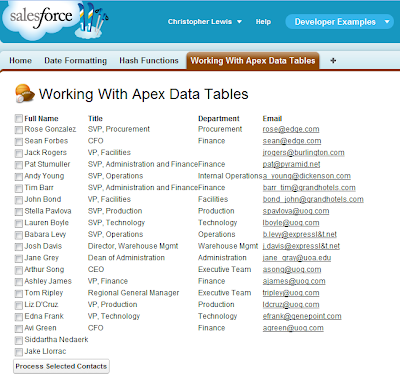
In the following example I have taken the majority of code from a previous blog post concerning creating a check-all checkbox on a data table. I have added apex messages in the previously empty perform action method to illustrate how they can be used. The following logic is applied in this method:

  • If no contacts are selected, an error message will be generated.
  • If all contacts are selected, a warning message will warn that the maximum amount of contacts have been selected.
  • In at least one contact has been selected, a confirmation message will be displayed, including a list of the selected contacts' names.
Here are some screenshots:
(Screen before interaction)


(No records Selected)


(4 contacts Selected)

Controller:
public class WorkingWithApexDataTablesController {

 public List<ContactWrapper> allContacts { get; set; }
 public Boolean allChecked { get; set; }
 
 public WorkingWithApexDataTablesController () {
  allContacts = new List<ContactWrapper>();
  allChecked = false;
  
  for(Contact contact: [select Name, Title, Department, Email                                   from Contact ]){ 
   allContacts.add(new ContactWrapper(contact));
  } 
 }
 
 public PageReference CheckAll(){
  
  for(ContactWrapper contact : allContacts){
   contact.selected = allChecked;
  }
  
  return null;
 }
 
 public PageReference ProcessSelectedContacts(){
  
  List<String> selectedContacts = new List<String>{};
  
  for (ContactWrapper contactWrapper : allContacts ){
   
   if(contactWrapper.selected == true){
     selectedContacts.add(contactWrapper.con.Name);
   }
  }
  
  if(selectedContacts.isEmpty()){
    // if no contacts have been selected, write an error message
    Apexpages.addMessage(new ApexPages.Message (                                ApexPages.Severity.ERROR, 'No contacts selected'));
  }
  else {
    // otherwise, write a confirmation message 
    Apexpages.addMessage(new ApexPages.Message (                                ApexPages.Severity.CONFIRM, selectedContacts.size() +                   ' contacts selected ' + selectedContacts));
  
    // If all contacts have been selected, write a warning message
    if(selectedContacts.size() == allContacts.size()){
        Apexpages.addMessage(new ApexPages.Message (                                    ApexPages.Severity.WARNING, 'All contacts selected'));
    }
  }
  
  
  return null;
 }

 public class ContactWrapper {
  
  public Contact con{get; set;}
        public Boolean selected {get; set;}
        
        public ContactWrapper(Contact c){
            con = c;
            selected = false;
        }
        
 }
}

Page:
<apex:page controller="WorkingWithApexDataTablesController">
  
  <apex:sectionHeader title="Working With Apex Data Tables"/>
  
  <apex:pageMessages />
  
  <apex:form >

    <apex:dataTable value="{!allContacts}" var="c" id="contactsTable">
      <apex:column >
        <apex:facet name="header">
          <apex:inputCheckbox value="{!allChecked}">
            <apex:actionSupport event="onclick" action="{!CheckAll}"
                                rerender="contactsTable"/>
          </apex:inputCheckbox>
        </apex:facet>
        <apex:inputCheckbox value="{!c.selected}"/>
      </apex:column>
      <apex:column value="{!c.con.Name}" headervalue="Full Name"/>
      <apex:column value="{!c.con.Title}" headervalue="Title"/>
      <apex:column value="{!c.con.Department}" 
                   headervalue="Department"/>
      <apex:column value="{!c.con.Email}" headervalue="Email"/>
    </apex:dataTable>

    <apex:commandButton action="{!ProcessSelectedContacts}" 
                        value="Process Selected Contacts"/>

  </apex:form>
</apex:page>

This is just a brief exploration of messages, but still shows how they can greatly improve the user experience. For more about messages, see the full apex page messages class definition, which includes the full enumeration of severity values. Also note that individual apex:pageMessage tags can be used to split up the messages to display at different points on the page and control their content directly on the page, should you so desire.

Monday, 4 October 2010

Creating a picklist in a Visualforce page without a -none- value

Update (7th August 2012): I have developed a new Visualforce component version of this functionality, for those who want to re-use this feature numerous times.

When building a custom Visualforce page, the need may arise to include a combo-box input based on a picklist field inside a Salesforce object. This is easy to achieve using an apex:inputField, as in the following example, where an Invoice Statement object contains a picklist field called Status.

VisualForce Page:
<apex:page controller="NoNoneForPicklistController">

    Please select required status:
    <apex:form >
        <apex:inputField value="{!invoiceStatement.Status__c}"/>
    </apex:form>  

</apex:page>
Controller:
public class NoNoneForPicklistController{

    public Invoice_Statement__c invoiceStatement {get;set;}
    
}

Screen-shot:


As you can see, the default value on the combo-box on the page is "-None-", which represents an empty value. It may be a preference to not display the empty value, but rather frustratingly, no configuration of the picklist object field can avoid this inclusion. There is no way to mark a picklist field as "required", and setting an option as default makes no difference either. That said, there are already ways to prevent an empty value being processed, using validation and feedback, but I have always been one to believe that prevention is better than cure.

Thankfully, there is a way to effectively create a picklist on a Visualforce list with no empty value. This can be achieved by using the Schema.DescribeFieldResult Salesforce standard class to retrieve all the possible field label value pairs for a picklist field. The retrieved value pairs are then stored inside a collection of select option objects, which can be used as the basis of a select list. Below is a snapshot of the code from the apex controller, and also the Visualforce page. As an added bonus, the default value specified in the picklist field object configuration can be used to set the initially selected value of the select list.

VisualForce Page:
<apex:page controller="NoNoneForPicklistController">

    Please select required status:
    <apex:form >
        <apex:selectList size="1" value="{!invoiceStatement.Status__c}">
            <apex:selectOptions value="{!statusOptions}"/>
        </apex:selectList>
    </apex:form>  

</apex:page>

Controller:
public class NoNoneForPicklistController{

    public Invoice_Statement__c invoiceStatement {get;set;}
    public List<SelectOption> statusOptions {get;set;}
    
    // Constructor called when page is accessed.
    public NoNoneForPicklistController() {
    
        invoiceStatement = new Invoice_Statement__c();        
        statusOptions = new List<SelectOption>();

        // Use DescribeFieldResult object to retrieve status field.
        Schema.DescribeFieldResult statusFieldDescription =                     Invoice_Statement__c.Status__c.getDescribe();

        // For each picklist value, create a new select option
        for (Schema.Picklistentry picklistEntry:                                statusFieldDescription.getPicklistValues()){

            statusOptions.add(new SelectOption(                                     pickListEntry.getValue(),pickListEntry.getLabel()));

            // obtain and assign default value
            if (picklistEntry.defaultValue){
                invoiceStatement.Status__c = pickListEntry.getValue();
            }  
        }     
    }
}

Screen-shot:

Friday, 24 September 2010

Converting decimal value to integer (don't fall into the trap!!)

During data handling within an application, it is not unusual to have a requirement to convert a decimal value into an integer equivalent. When attempting to do accomplish this inside Apex code, you may think that writing something similar to the following will perform the conversion:

Decimal decimalValue = 12.0;
Integer integerValue = Integer.valueOf(decimalValue);

Using code like this will compile without a problem, but upon execution, an error message "System.TypeException: Invalid Integer" will appear (see screen-shot for an example). This is because the input variable "decimalValue" contains more than just numbers, it also contains a decimal place, which causes the conversion to be rejected by the "valueOf" function.


The method that should always be used to perform this kind of conversion is *decimal variable*.intValue(). So in our example above the Apex code should look like this:

Decimal decimalValue = 12.0;
Integer integerValue = decimalValue.intValue();


Now the conversion will work without error.

Wednesday, 18 August 2010

Displaying different date formats on Visualforce pages.

A common requirement of a Salesforce application is to display date and time information. What is not so common, is how this information needs to be displayed.

Varying the format of a dateTime field inside a Visualforce page is quite straightforward. It involves wrapping the field in a mask and then passing the data as a parameter, like so:

Page:
<apex:outputText value="{0,date,{!dateFormat}}">
     <apex:param value="{!myDateTime}" />
</apex:outputText>

In order to illustrate how this works, I have constructed a page and controller with a few samples. Below is a screenshot of the page displaying a single date (31st December 2010, 23:59:59) in various different formats. The first column of the table shows the string used as the date format mask, whilst the second column shows how that date appears when the mask is applied to the date.


Note that for formats that include literal text, escape characters are required in the controller so that the result renders properly. In my example, Day of the year has to be written as \'Day of the year\' in the formatting String. For all those interested, here is the page and controller code I used to construct the page:

Controller:
public class DateFormattingController {

  Datetime myDateTime = datetime.newInstance(2010, 12, 31, 23, 59, 59);

  List<String> dateFormats = new List<String> {
     'dd.MM.yy HH:mm:ss',
     'MMM-dd-yyyy hh:mm a',
     'EEEEE dd MMMMM yyyy G',
     'E hh:mm:ss:SSS z',
     'zzzzz (Z), \'Day of the year:\' D' 
  };
   
  public DateTime getMyDateTime(){
    return myDateTime;
  }

  public List<String> getDateFormats(){
    return dateFormats;
  }
}

Page:
<apex:page controller="DateFormattingController">
    
    <apex:sectionHeader title="Date Formatting"/>
    
    <apex:outputText value="Standard Output Format: {!myDateTime}"/>
    
    <apex:pageBlock >
        <apex:pageBlockTable value="{!dateFormats}" var="dateFormat">
            <apex:column headerValue="Date Format" value="{!dateFormat}"                                   width="50%"/>
            <apex:column headerValue="Output" width="50%">
                <apex:outputText value="{0,date,{!dateFormat}}">
                    <apex:param value="{!myDateTime}" />
                </apex:outputText>
            </apex:column>
        </apex:pageBlockTable>
    </apex:pageBlock>
    
</apex:page>

See Paul's Salesforce Blog for the full date format letter table. Any missing formats or unsure how to construct a particular format, leave me a comment on the post and I'll see what I can do!

Friday, 30 July 2010

"Check All" checkbox in an apex:dataTable (without using scripts)

Recently, a business requirement emerged for a client whereby a user needed to be able to select a number of contacts from a data table, and then carry out some business logic on those selected clients. The process of selecting several contacts using a wrapper class is easy enough, but what about a simple way to select and deselect all of the records in one go? This can be achieved placing a checkbox in the header element of the column. I found an example solution that uses a javascript function embedded on the page to copy the true/false value of the header checkbox to all the boxes in the column.

This certainly does the job, but I found from a design perspective it had some limitations. The javascript function it calls gets the elements by tag, specifically the input tag, which may be used elsewhere if the page you are designing contains more than just this data table. Also, placing selection controls in scripts divides the selection logic between two entities; the page and the apex controller class.

With this in mind, I started to think about how I could develop an equivalent solution that uses logic inside the controller to change the state of all of the checkboxes. This is the solution I came up with:

Controller:
public class CheckboxCheckAllController {
 
 public List<ContactWrapper> allContacts { get; set; }
 public Boolean allChecked { get; set; }
 
 public CheckboxCheckAllController () {
  allContacts = new List<ContactWrapper>();
  allChecked = false;
  
  for(Contact contact: [select Name, Title, Department, Email from Contact ]){ 
   allContacts.add(new ContactWrapper(contact));
  } 
 }
 
 public PageReference CheckAll(){
  
  for(ContactWrapper contact : allContacts){
   contact.selected = allChecked;
  }
  
  return null;
 }
 
 public PageReference ProcessSelectedContacts(){
  
  for (ContactWrapper contactWrapper : allContacts ){
   if(contactWrapper.selected == true){
    /* Do Some Processing */
   }
  }
  
  return null;
 }

 public class ContactWrapper {
  
  public Contact con{get; set;}
        public Boolean selected {get; set;}
        
        public ContactWrapper(Contact c){
            con = c;
            selected = false;
        }
        
 }
}

Page:
<apex:page controller="CheckboxCheckAllController">

  <apex:form>

    <apex:dataTable value="{!allContacts}" var="c" id="contactsTable">
      <apex:column>
        <apex:facet name="header">
          <apex:inputCheckbox value="{!allChecked}">
            <apex:actionSupport event="onclick" action="{!CheckAll}"
                                rerender="contactsTable"/>
          </apex:inputCheckbox>
        </apex:facet>
        <apex:inputCheckbox value="{!c.selected}"/>
      </apex:column>
      <apex:column value="{!c.con.Name}" headervalue="Full Name"/>
      <apex:column value="{!c.con.Title}" headervalue="Title"/>
      <apex:column value="{!c.con.Department}" 
                   headervalue="Department"/>
      <apex:column value="{!c.con.Email}" headervalue="Email"/>
    </apex:dataTable>

    <apex:commandButton action="{!ProcessSelectedContacts}" 
                        value="Process Selected Contacts"/>

  </apex:form>
</apex:page>

Page In Browser:


Admittedly, it provides a slightly slower response time than the pure javascript, but I think this provides benefits in singularity of location of control code and adaptability, as you can control the behaviour of the selection using array logic.

Thursday, 22 July 2010

Report Builder Developer Preview Webinar Feedback

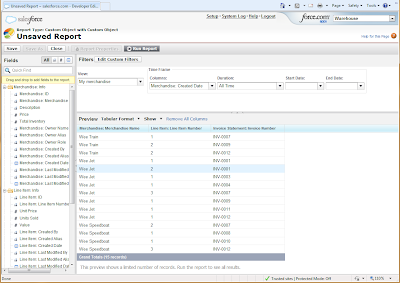
Today I took part in the new Report Builder Webinar, which included a demonstration of the new builder tool Salesforce has created in response to users commenting that the existing wizard was clumsy and made making changes a very arduous process. In the past, creating a single report involved plodding through seven setup screens, which all have to be repeated if you want to make a single change, and there is no clue as to what the report will look like until all these preparation steps have been completed. The new tool is much more interactive, providing a single screen with an active preview of the report based on a small portion of your existing data. The report is refreshed every time you make a change, so you always have an exact idea of the reports end appearance.

The Report Builder is already available in all developer editions. To really appreciate the improvement, I had a go at creating a few simple reports using both the standard wizard and the new report builder. Using the new tool is a vast improvement and a lot more intuitive. I was able to add fields, change the order of fields, order data, group rows and impose date period restrictions on fields immediately using built in menus. The report builder can create reports for both standard and custom objects, and even pre-prepares standard report templates for custom objects based on their relationships with other Salesforce objects.

To access the report builder, click on the Reports tab (can be included in an app through setup if not there already), and then on the “Create Report With Report Builder” button. The “Create New Custom Report” button allows you to use the old report wizard.

The report builder will be rolled out to all editions in the Winter ’11 release later this year, so is not immediately available to create and manipulate reports in Salesforce applications. However, because the underlying metadata for reports is the same no matter which composer is used, you could potentially use developer accounts to create the reports using the new builder and then copy the metadata to your production application. For this to work you must ensure that the underlying object models between the developer copy and your production org are the same.

Tuesday, 20 July 2010

Frustrations with the home page default view for objects

Throughout my time using the Force platform, I have found the default view displayed on object home pages clumsy and counter intuitive. Here is an example of a home page for a custom object, merchandise, that featured as part of the exercises inside the Force.com workbook.


Now, imagine you are looking at this view for the first time, you see a list of Merchandise objects (Wee Speedboat, Wee Train, Wee Jet) and the view indicator says 'All', this must be all of the Merchandise records in the system right? Wrong!! this is actually a list of merchandise records that were recently viewed by you. This is indicated by a small drop down box on the right hand side of the screen, where you don't instinctively think to look. Worse still, the two other options in the list 'Recently Created' and 'Recently Modified' only show the records that you personally have created or modified, so from an overall data perspective, you have no idea what is going on.

While these views are useful in certain approaches and data models, I do not understand why they are part of a default view that cannot be changed. If you open the 'All' view by clicking on the 'Go!' button, you get the following view on the screen.


I feel that even this would be a more suitable home page, with 'Recently Modified', 'Recently Viewed' and 'Recently Created' all as standard views on the drop down menu (with the words 'by you' after them for clarity). If a report page block was required as is necessary with some objects, this could be included underneath the view section.

The issue has been raised in the Salesforce idea exchange but no solution has been introduced in the four years since this was posted, which I find frankly unbelievable. Salesforce's view on this issue seems to be that if customizations to the default view are required, then a Visualforce page can be created with the appropriate appearance. Still, I don't see why the appearance can't be changed in the same way that objects have an individual record page layout that can be customised. It could be as simple as allowing the user to decide if they want the recent list and the default view that they wish to use.

With this in mind, I am seriously considering trying my hand at developing an application for the Salesforce AppExchange which would provide a simple menu that administrators could click through to create a basic custom home page for a particular object, views included.