The controller code to create a new page message and add it to the current page:
Apexpages.addMessage(new ApexPages.Message(ApexPages.severity, messageBody));
for example:

Apexpages.addMessage(new ApexPages.Message (ApexPages.Severity.ERROR,                                           'Hello World Error'));
To display the messages on the page is simply a case of using the apex:pageMessages tag, like so:
<apex:pageMessages/>
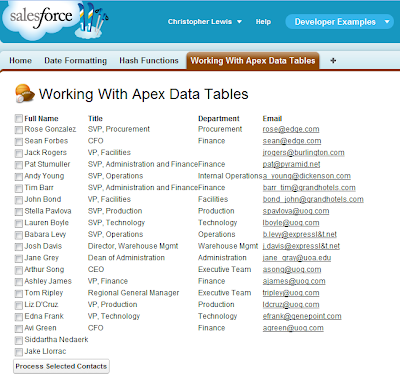
In the following example I have taken the majority of code from a previous blog post concerning creating a check-all checkbox on a data table. I have added apex messages in the previously empty perform action method to illustrate how they can be used. The following logic is applied in this method:
- If no contacts are selected, an error message will be generated.
- If all contacts are selected, a warning message will warn that the maximum amount of contacts have been selected.
- In at least one contact has been selected, a confirmation message will be displayed, including a list of the selected contacts' names.
(Screen before interaction)
(No records Selected)
(4 contacts Selected)
Controller:
public class WorkingWithApexDataTablesController {

 public List<ContactWrapper> allContacts { get; set; }
 public Boolean allChecked { get; set; }

 public WorkingWithApexDataTablesController () {
  allContacts = new List<ContactWrapper>();
  allChecked = false;

  for(Contact contact: [select Name, Title, Department, Email                                   from Contact ]){
   allContacts.add(new ContactWrapper(contact));
  }
 }

 public PageReference CheckAll(){

  for(ContactWrapper contact : allContacts){
   contact.selected = allChecked;
  }

  return null;
 }

 public PageReference ProcessSelectedContacts(){

  List<String> selectedContacts = new List<String>{};

  for (ContactWrapper contactWrapper : allContacts ){

   if(contactWrapper.selected == true){
     selectedContacts.add(contactWrapper.con.Name);
   }
  }

  if(selectedContacts.isEmpty()){
    // if no contacts have been selected, write an error message
    Apexpages.addMessage(new ApexPages.Message (                                ApexPages.Severity.ERROR, 'No contacts selected'));
  }
  else {
    // otherwise, write a confirmation message
    Apexpages.addMessage(new ApexPages.Message (                                ApexPages.Severity.CONFIRM, selectedContacts.size() +                   ' contacts selected ' + selectedContacts));

    // If all contacts have been selected, write a warning message
    if(selectedContacts.size() == allContacts.size()){
        Apexpages.addMessage(new ApexPages.Message (                                    ApexPages.Severity.WARNING, 'All contacts selected'));
    }
  }


  return null;
 }

 public class ContactWrapper {

  public Contact con{get; set;}
        public Boolean selected {get; set;}

        public ContactWrapper(Contact c){
            con = c;
            selected = false;
        }

 }
}
Page:
<apex:page controller="WorkingWithApexDataTablesController">

  <apex:sectionHeader title="Working With Apex Data Tables"/>

  <apex:pageMessages />

  <apex:form >

    <apex:dataTable value="{!allContacts}" var="c" id="contactsTable">
      <apex:column >
        <apex:facet name="header">
          <apex:inputCheckbox value="{!allChecked}">
            <apex:actionSupport event="onclick" action="{!CheckAll}"
                                rerender="contactsTable"/>
          </apex:inputCheckbox>
        </apex:facet>
        <apex:inputCheckbox value="{!c.selected}"/>
      </apex:column>
      <apex:column value="{!c.con.Name}" headervalue="Full Name"/>
      <apex:column value="{!c.con.Title}" headervalue="Title"/>
      <apex:column value="{!c.con.Department}"
                   headervalue="Department"/>
      <apex:column value="{!c.con.Email}" headervalue="Email"/>
    </apex:dataTable>

    <apex:commandButton action="{!ProcessSelectedContacts}"
                        value="Process Selected Contacts"/>

  </apex:form>
</apex:page>
This is just a brief exploration of messages, but still shows how they can greatly improve the user experience. For more about messages, see the full apex page messages class definition, which includes the full enumeration of severity values. Also note that individual apex:pageMessage tags can be used to split up the messages to display at different points on the page and control their content directly on the page, should you so desire.


