Friday, 30 July 2010

"Check All" checkbox in an apex:dataTable (without using scripts)

Recently, a business requirement emerged for a client whereby a user needed to be able to select a number of contacts from a data table, and then carry out some business logic on those selected clients. The process of selecting several contacts using a wrapper class is easy enough, but what about a simple way to select and deselect all of the records in one go? This can be achieved placing a checkbox in the header element of the column. I found an example solution that uses a javascript function embedded on the page to copy the true/false value of the header checkbox to all the boxes in the column.

This certainly does the job, but I found from a design perspective it had some limitations. The javascript function it calls gets the elements by tag, specifically the input tag, which may be used elsewhere if the page you are designing contains more than just this data table. Also, placing selection controls in scripts divides the selection logic between two entities; the page and the apex controller class.

With this in mind, I started to think about how I could develop an equivalent solution that uses logic inside the controller to change the state of all of the checkboxes. This is the solution I came up with:

Controller:
public class CheckboxCheckAllController {
 
 public List<ContactWrapper> allContacts { get; set; }
 public Boolean allChecked { get; set; }
 
 public CheckboxCheckAllController () {
  allContacts = new List<ContactWrapper>();
  allChecked = false;
  
  for(Contact contact: [select Name, Title, Department, Email from Contact ]){ 
   allContacts.add(new ContactWrapper(contact));
  } 
 }
 
 public PageReference CheckAll(){
  
  for(ContactWrapper contact : allContacts){
   contact.selected = allChecked;
  }
  
  return null;
 }
 
 public PageReference ProcessSelectedContacts(){
  
  for (ContactWrapper contactWrapper : allContacts ){
   if(contactWrapper.selected == true){
    /* Do Some Processing */
   }
  }
  
  return null;
 }

 public class ContactWrapper {
  
  public Contact con{get; set;}
        public Boolean selected {get; set;}
        
        public ContactWrapper(Contact c){
            con = c;
            selected = false;
        }
        
 }
}

Page:
<apex:page controller="CheckboxCheckAllController">

  <apex:form>

    <apex:dataTable value="{!allContacts}" var="c" id="contactsTable">
      <apex:column>
        <apex:facet name="header">
          <apex:inputCheckbox value="{!allChecked}">
            <apex:actionSupport event="onclick" action="{!CheckAll}"
                                rerender="contactsTable"/>
          </apex:inputCheckbox>
        </apex:facet>
        <apex:inputCheckbox value="{!c.selected}"/>
      </apex:column>
      <apex:column value="{!c.con.Name}" headervalue="Full Name"/>
      <apex:column value="{!c.con.Title}" headervalue="Title"/>
      <apex:column value="{!c.con.Department}" 
                   headervalue="Department"/>
      <apex:column value="{!c.con.Email}" headervalue="Email"/>
    </apex:dataTable>

    <apex:commandButton action="{!ProcessSelectedContacts}" 
                        value="Process Selected Contacts"/>

  </apex:form>
</apex:page>

Page In Browser:


Admittedly, it provides a slightly slower response time than the pure javascript, but I think this provides benefits in singularity of location of control code and adaptability, as you can control the behaviour of the selection using array logic.

Thursday, 22 July 2010

Report Builder Developer Preview Webinar Feedback

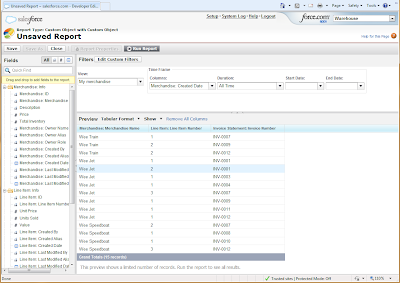
Today I took part in the new Report Builder Webinar, which included a demonstration of the new builder tool Salesforce has created in response to users commenting that the existing wizard was clumsy and made making changes a very arduous process. In the past, creating a single report involved plodding through seven setup screens, which all have to be repeated if you want to make a single change, and there is no clue as to what the report will look like until all these preparation steps have been completed. The new tool is much more interactive, providing a single screen with an active preview of the report based on a small portion of your existing data. The report is refreshed every time you make a change, so you always have an exact idea of the reports end appearance.

The Report Builder is already available in all developer editions. To really appreciate the improvement, I had a go at creating a few simple reports using both the standard wizard and the new report builder. Using the new tool is a vast improvement and a lot more intuitive. I was able to add fields, change the order of fields, order data, group rows and impose date period restrictions on fields immediately using built in menus. The report builder can create reports for both standard and custom objects, and even pre-prepares standard report templates for custom objects based on their relationships with other Salesforce objects.

To access the report builder, click on the Reports tab (can be included in an app through setup if not there already), and then on the “Create Report With Report Builder” button. The “Create New Custom Report” button allows you to use the old report wizard.

The report builder will be rolled out to all editions in the Winter ’11 release later this year, so is not immediately available to create and manipulate reports in Salesforce applications. However, because the underlying metadata for reports is the same no matter which composer is used, you could potentially use developer accounts to create the reports using the new builder and then copy the metadata to your production application. For this to work you must ensure that the underlying object models between the developer copy and your production org are the same.

Tuesday, 20 July 2010

Frustrations with the home page default view for objects

Throughout my time using the Force platform, I have found the default view displayed on object home pages clumsy and counter intuitive. Here is an example of a home page for a custom object, merchandise, that featured as part of the exercises inside the Force.com workbook.


Now, imagine you are looking at this view for the first time, you see a list of Merchandise objects (Wee Speedboat, Wee Train, Wee Jet) and the view indicator says 'All', this must be all of the Merchandise records in the system right? Wrong!! this is actually a list of merchandise records that were recently viewed by you. This is indicated by a small drop down box on the right hand side of the screen, where you don't instinctively think to look. Worse still, the two other options in the list 'Recently Created' and 'Recently Modified' only show the records that you personally have created or modified, so from an overall data perspective, you have no idea what is going on.

While these views are useful in certain approaches and data models, I do not understand why they are part of a default view that cannot be changed. If you open the 'All' view by clicking on the 'Go!' button, you get the following view on the screen.


I feel that even this would be a more suitable home page, with 'Recently Modified', 'Recently Viewed' and 'Recently Created' all as standard views on the drop down menu (with the words 'by you' after them for clarity). If a report page block was required as is necessary with some objects, this could be included underneath the view section.

The issue has been raised in the Salesforce idea exchange but no solution has been introduced in the four years since this was posted, which I find frankly unbelievable. Salesforce's view on this issue seems to be that if customizations to the default view are required, then a Visualforce page can be created with the appropriate appearance. Still, I don't see why the appearance can't be changed in the same way that objects have an individual record page layout that can be customised. It could be as simple as allowing the user to decide if they want the recent list and the default view that they wish to use.

With this in mind, I am seriously considering trying my hand at developing an application for the Salesforce AppExchange which would provide a simple menu that administrators could click through to create a basic custom home page for a particular object, views included.

Thursday, 1 July 2010

Adding alphabetical lists in Salesforce PDFs

One of the better features of Salesforce and apex programming is the ability to generate Visualforce pages as PDFs by simply using the renderAs="pdf" attribute notation in the apex:page tag. However, recently when using this feature to generate a list of conditions, I noticed that whenever you define an apex datalist, or an ordered list in html that uses letters (a,b,c,d) as the markers for each element in the list, these are rendered in the PDF incorrectly.

Take the following example of a page and controller:

Page:
<apex:page showHeader="false" controller="LetterListController" standardStylesheets="false" sidebar="false">

<apex:dataList value="{!accounts}" type="a" var="account" id="theList" >
<apex:outputText value="{!account.name}"/>
</apex:dataList>

<ol type="a">
<li>First Item</li>
<li>Second Item</li>
<li>Third Item</li>
<li>Last Item</li>
</ol>

</apex:page>

Controller:
public class LetterListController {

List<Account> accounts;

public List<Account> getAccounts() {
if(accounts == null) accounts = [select name from account limit 10];
return accounts;
}
}


When the Letter List page is rendered in Salesforce, the following output appears-


Absolutely fine, but when we add the renderAs="pdf" attribute in the page tag definition, the PDF output is -


The apex datalist has been rendered as a list with blobs, while the html list has been changed to be ordered by numbers. This is quite frustrating, but the solution is simple. You can choose the bullet point class of a list using the css attribute list-style-type. So all we need to do is create a style class on the page inside head tags, and then apply this class to the two lists.

Page:

<apex:page showHeader="false" controller="LetterListController" standardStylesheets="false" sidebar="false" renderas="PDF">

<head>
<style>
.letterList{
list-style-type: lower-alpha;
}
</style>
</head>


<apex:dataList value="{!accounts}" var="account" id="theList" styleClass="letterList">
<apex:outputText value="{!account.name}"/>
</apex:dataList>

<ol class="letterList" type="a">
<li>First Item</li>
<li>Second Item</li>
<li>Third Item</li>
<li>Last Item</li>
</ol>

</apex:page>

The output PDF is now -


Tuesday, 29 June 2010

"Chatter-Bot" scoops grand prize in Chatter Developer Challenge

The Salesforce Chatter Developer challenge has ended and the winner has been announced as Chatter Bot by Michael Leach. Chatter Bot is a project that enables the transfer of real world physical sensor data to the Salesforce cloud in the form of Chatter.The Chatter Bot has it's very own personal profile within Chatter, and updates subscribers of significant readings from light and motion sensors.

The following video shows Chatter Bot in action


What impresses me most about this idea is that it really plays on Chatters aim of making information more personable and efficient. Using sensors in this context may get scientists and security organisations thinking about how they could make effective use of combining sensor input with cloud technology.

A Chatter adaptation for the Android mobile phone platform developed by Jeff Douglas came second in the competition. Third place was shared by three separate projects; Location Glimpse; a location sharing application, Txt2Chatter; a text message service that allows users to remotely update their status, and Feed Sentiment; providing managers with an overview of how the sales team is feeling about current opportunities.

Wednesday, 9 June 2010

2 uses of the apex:outputPanel tag

Throughout my experience with the force, I have come across a few problems where the solution involved simply the inclusion an apex:outputPanel tag. Below are two uses that are not commonly known.

  1. Multi-component facets

    When using facets, salesforce only allows for a single sub-component as the contents. If you require multiple components, such as an image and text for an action status, then simply enter an apex:outputPanel tag inside the facet, then place all of your components inside.


  2. Partial form refreshing

    When developing apex pages, a common request is to make components appear and hide using the 'rendered' attribute. If a component is hidden, and an action occurs that then requires that component to be shown, you cannot simply re-render the component, as it was never rendered and so does not exist in the current context of the page. Normally this means you have to refresh an entire form, but this can be avoiding using an ouput panel around the components to be shown and hidden, and by using the id of the output panel in the 'reRender' attribute of the action


Wednesday, 26 May 2010

An Introduction

I am currently working on creating a prototype system on the Force.com cloud computing development platform. Using cloud based technology has allowed the client I worked for to access and interact with their data directly and securely from anywhere using an internet browser, whilst improving the user experience significantly with an interactive graphical user interface over a standard "green screen" approach.

While working with this technology, I have found that the best insight and practical advice on using the platform actually comes from personal blogs. With this in mind, the purpose of this blog is to publish my own hints, tips and experiences using the Force.com platform and also report on and provide links to the latest emerging cloud computing technology.

Please bookmark this blog and keep in touch. Enjoy!

As a final note, I would like to thank Jason Venable and Jeff Douglas for their blogs, which have provided helpful solutions and techniques to employ while using the force.